- Self adhesive wallpaper (3-4 rolls)
- Exacto knife
- Wallpaper smoother
- Paint and paintbrush if painting the doors' trim/track. I used FUSION paint (colour: casement aka WHITE)
- a helper
I'm not a fan of mirrored sliding doors, especially when they are surrounded in ugly gold. This particular one in our new place is located around the corner from the front entryway. It houses extra coats, shoes, etc. The positioning of this closet is such that if you are in the main bathroom (located down the hall) with the door open, someone sitting in the living room can look in the mirrored door into the mirror in the bathroom and creep on you. Ya ya, random weird thought, but I won't lie, we've done it. That aside, I just found the big mirrored doors to be an eye sore and unnecessary as I hung a large mirror by the front door so we can check ourselves out on the way out of the house.
Anyway, this project was not on my list of things to do. It was a random, spur of the moment project I started on the weekend. Earlier in the week I had been at Dollarama and I saw that they had rolls of self adhesive wallpaper. They didn't have a wide array of patterns/colours but for $2/roll I figured I would use this for something in the future, so I picked up a couple rolls of 2 different patterns. When I got home I threw them in the bottom of my closet where most of my "crafty" supplies are housed (classy, I know). Fast forward a few days, I was on Pinterest and saw DIY closet door makeovers. I saw some people had painted their doors, hung fabric, etc. I remembered the wallpaper in my closet and decided to give it a try. I will say, I totally jumped into this project way too fast, didn't logistically think things through, and it kind of bit me in the ass. I immediately ripped open the wallpaper and started to stick it on. It wasn't hanging straight, and I had tons of air bubbles. Nonetheless I hung it, and realized I didn't have enough. The wide of the mirror was slightly larger than the width of the paper. Not to worry, I figured I could just overlap another strip of it. The only problem being, I didn't have any more paper. I ran out to Dollarama, and they didn't have any of it left. Crap. Luckily at another location they had some, so I scooped up the remainder of what they had left.
Prior to hanging your wallpaper, I highly recommend you paint the surround of the door and track first. I didn't, and it was a pain. If you're handy, it would probably be easier to remove the doors completely so you can get in every nook and cranny. I have a very very limited tool box (i.e. a hammer and 2 screwdrivers) and really had no clue how to go about taking the doors off so I painted them while they were still hung. It worked out ok. I just focused on the parts that would be visible when the doors were fully closed, and kind of half assed the rest (just being honest LOL). I used a new paint I just discovered called Fusion paint. It is similar to chalk paint in that you don't have to do any prep work, and it has a nice soft finish. This is even better because you don't need to put a top coat/sealer/wax on it. I used it because I had it on hand, and I didn't want to have to run out to the store to get new paint. It worked quite well. It had good coverage. I think in most spots I used two coats.
Here's what the door looked like before:
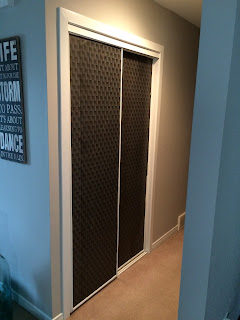
Ok I'm typing this part right after I put the wallpaper on the doors. K first off, that shit is tacky. SO TACKY. I'm not gonna lie, I struggled putting this stuff on the doors. It would have been very helpful to have a second set of hands to help put this on. FRIENDLY TIP: have someone else at home to help you put the paper on the door!!!! For real though, god, this was kind of a hack job. There's tons of air bubbles and creases in it. It looks ok from a distance but up close.... not so much LOL. This does come off though, so if I can't stand the look of it after a few days/weeks, I can take it down and reapply when I have someone here to help me get it on smooth. Oh, another TIP: since you're going to have to overlap the paper on the mirror, or cut a strip from another roll since it's not wide enough, be sure you pick a fairly plain/basic pattern so it's easy to line up, or; in my case, isn't blaringly obvious when you don't even attempt to line it up and just smack it up there to get 'er done. Without further adieu, here is the end result:
Is it perfect? Far from it. Did it get rid of tacky gold mirrored door? YES.
A win in my book.


No comments:
Post a Comment